Rails with Webpacker, a full setup
Create a new Rails application without Webpacker
Minimal application
1
2
$> rails new myapp --minimal
$> cd myapp
The minimal flag means “please install a default Rails app with the fewest possible dependencies”. See this article about the rails new command.
Add the bare minimum files
Now create a default route, controller, and view
1
2
3
4
5
# inside config/routes.rb
Rails.application.routes.draw do
  get "welcome/index"
  root to: "welcome#index"
end
1
2
3
# inside app/controllers/welcome_controller.rb
class WelcomeController < ApplicationController
end
1
2
<!-- inside app/views/welcome/index.html.erb -->
<h1> Hello, Rails and Webpack ! </h1>
And run the Rails application
1
$/myapp> bin/rails server
Open the browser at localhost:3000, you should see “Hello, Rails and Webpack !”
Add the Webpacker gem to Rails
Open the Gemfile and add this line :
1
2
# Transpile app-like JavaScript. Read more: https://github.com/rails/webpacker
gem 'webpacker', '~> 5.0'
Stop the server, and run
1
$myapp> bundle install
And
1
$myapp> bin/rails webpacker:install
Here is the list of what the last command does (extracted from output, and simplified) :
1
2
3
4
5
6
7
8
9
10
11
12
13
14
      create  config/webpacker.yml
      create  config/webpack
      create  config/webpack/development.js
      create  config/webpack/environment.js
      create  config/webpack/production.js
      create  config/webpack/test.js
      create  postcss.config.js
      create  babel.config.js
      create  .browserslistrc
      The JavaScript app source directory already exists (app/javascript)
      create    bin/webpack
      create    bin/webpack-dev-server
      append  .gitignore
      run  yarn add @rails/webpacker@5.2.1 from "."
And now our package.json look like this :
1
2
3
4
5
6
7
8
9
10
{
  "dependencies": {
    "@rails/webpacker": "5.3.0",
    "webpack": "^4.46.0",
    "webpack-cli": "^3.3.12"
  },
  "devDependencies": {
    "webpack-dev-server": "^3.11.2"
  }
}
This highlight the fact that webpacker is just a wrapper around webpack.
Change Rails default directory for Webpacker
The annoying thing with Rails and Webpack(er) is that the default integration considers that only JavaScript should be handled by Webpack, and other assets should be handled by an older gem (Sprockets). Now webpacker is fully mature, so let’s use it only.
Rename app/javascript to app/frontend, like this :
1
$/myapp> mv app/javascript app/frontend
In config/webpacker.yml, change the name of the folder as follow :
1
2
3
4
# Inside webpacker.yml, first lines
default: &default
  source_path: https://res.cloudinary.com/bdavidxyz-com/image/upload/w_1600,h_836,q_100/l_text:Karla_72_bold:Rails%20with%20Webpacker%20%20a%20full%20setup,co_rgb:ffe4e6,c_fit,w_1400,h_240/fl_layer_apply,g_south_west,x_100,y_180/l_text:Karla_48:A%20Ruby-on-Rails%20tutorial,co_rgb:ffe4e680,c_fit,w_1400/fl_layer_apply,g_south_west,x_100,y_100/newblog/globals/bg_me.jpg
  source_entry_path: https://res.cloudinary.com/bdavidxyz-com/image/upload/w_1600,h_836,q_100/l_text:Karla_72_bold:Rails%20with%20Webpacker%20%20a%20full%20setup,co_rgb:ffe4e6,c_fit,w_1400,h_240/fl_layer_apply,g_south_west,x_100,y_180/l_text:Karla_48:A%20Ruby-on-Rails%20tutorial,co_rgb:ffe4e680,c_fit,w_1400/fl_layer_apply,g_south_west,x_100,y_100/newblog/globals/bg_me.jpg
Add a first frontend file
As you can guess from the configuration above, Webpack will turn into a “pack” (compiled file that could be referenced in a html page) any file under the app/frontend/packs directory.
So let’s add app/frontend/packs/mainjs.js
1
2
// inside app/frontend/packs/mainjs.js
console.log("Hello from mainjs")
Build (web)packs with Rails
Rails will automatically run some build when running a local server, but for this tutorial, we want to understand exactly what’s going on.
So far, you should have a /public folder at the root of your app, but not any /public/packs folder, which is the default build output of webpacker.
Let’s build our packs buy running
1
2
$/myapp> bin/rails assets:clobber
$/myapp> bin/rails webpacker:compile
The first line cleans any previous build, the second line runs the actual build.
Now let’s check what happened
1
2
3
4
5
6
7
8
9
10
11
12
13
14
15
16
17
18
19
20
21
22
23
24
25
26
27
28
29
30
31
32
33
34
35
36
37
38
39
40
41
**bin/rails webpacker:compile**

**Compiling...**

**Compiled all packs in /Users/david/workspace/myapp/public/packs**

**warning package.json: No license field**


**Hash: 242563483b6f56b94cc3**

**Version: webpack 4.46.0**

**Time: 1316ms**

**Built at: 04/12/2021 9:58:18 AM**

**Asset Size  Chunks Chunk Names**

**js/mainjs-266dceea7f600337d3ed.js  1 KiB 0  [emitted] [immutable]  mainjs**

**js/mainjs-266dceea7f600337d3ed.js.br  467 bytes  [emitted]**

**js/mainjs-266dceea7f600337d3ed.js.gz  528 bytes  [emitted]**

**js/mainjs-266dceea7f600337d3ed.js.map 4.67 KiB 0  [emitted] [dev]  mainjs**

**js/mainjs-266dceea7f600337d3ed.js.map.br 1.59 KiB  [emitted]**

**js/mainjs-266dceea7f600337d3ed.js.map.gz 1.78 KiB  [emitted]**

**manifest.json  329 bytes  [emitted]**

**manifest.json.br  122 bytes  [emitted]**

**manifest.json.gz  135 bytes  [emitted]**

**Entrypoint mainjs = js/mainjs-266dceea7f600337d3ed.js js/mainjs-266dceea7f600337d3ed.js.map**

**[0] ./app/frontend/packs/mainjs.js 33 bytes {0} [built]**
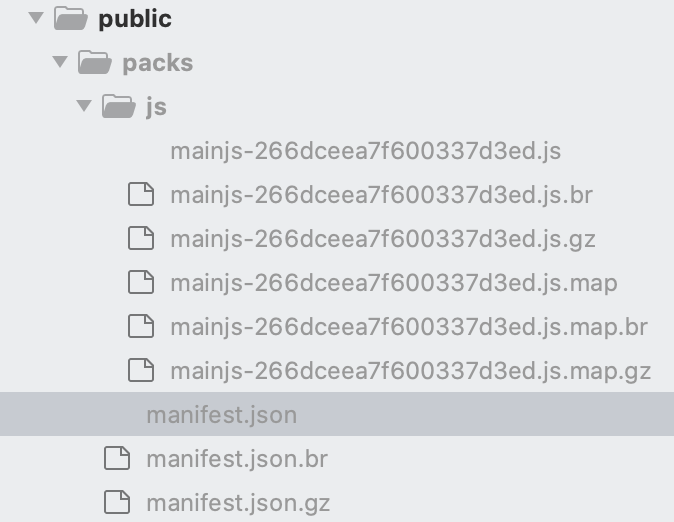
Webpack creates a bunch of files, even if we created so far a simple JS file with a simple console.log. Open the public/packs/js folder to notice it :

Ok, for one file : six possible extensions.
Look also at the manifest.json file :
1
2
3
4
5
6
7
8
9
10
11
12
13
14
{
  "entrypoints": {
    "mainjs": {
      "js": [
        "/packs/js/mainjs-266dceea7f600337d3ed.js"
      ],
      "js.map": [
        "/packs/js/mainjs-266dceea7f600337d3ed.js.map"
      ]
    }
  },
  "mainjs.js": "/packs/js/mainjs-266dceea7f600337d3ed.js",
  "mainjs.js.map": "/packs/js/mainjs-266dceea7f600337d3ed.js.map"
}
The manifest.json is here to help. If an HTML file is looking for a js file named “mainjs”, it will ask to the manifest.json where the exact location is.
Webpacker for JavaScript
The example above was with a JavaScript file, so good news : we already made half of the job.
Reference an existing pack
Now reference our mainjs file into the HTML by modifying the main layout (app/views/layouts/application.html.erb) :
1
2
3
4
5
6
7
8
9
10
11
12
13
14
15
16
17
18
<!-- inside app/views/layouts/application.html.erb -->
<!DOCTYPE html>
<html>
  <head>
    <title>Rails and Webpack</title>
    <meta name="viewport" content="width=device-width,initial-scale=1">
    <%= csrf_meta_tags %>
    <%= csp_meta_tag %>

    <!-- Remove stylesheet_link_tag  -->
    <!-- Add the line below  -->
    <%= javascript_pack_tag 'mainjs' %>
  </head>

  <body>
    <%= yield %>
  </body>
</html>
Stop and restart the local web server
1
$/myapp> bin/rails server
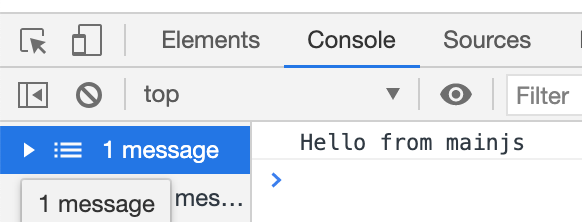
Open the browser at localhost:3000 to see if the log message is displayed in the browser’s dev tools.

Using an es6 module
If you want a regular ES6 module that will not be a pack, simply add a folder app/frontend/js, like this :
1
2
3
4
5
// inside app/frontend/js/magicAdd.js
const  magicAdd = (a, b) => {
  return a + b;
}
export default  magicAdd;
And reference this file from the pack :
1
2
3
4
5
6
7
8
// inside app/frontend/packs/mainjs.js

import magicAdd from '../js/magicAdd.js'

let a = magicAdd(2, 4);

// remove old console.log, and replace by the one below
console.log(`From mainjs, magicAdd result is ${a}`)
Now open your browser and check the browser’s console to see if everything works properly.
Webpacker for Stylesheets
First, change every extract_css: false to extract_css: true inside config/webpacker.yml. Or webpack won’t be able to detect scss files as a possible pack.
Now, create a pack, but this time, it should be a scss file (app/frontend/packs/mainstyle.scss) :
1
2
3
4
5
6
// inside app/frontend/packs/mainstyle.scss

// Just a quick ugly style to see if our CSS works
h1 {
  text-decoration: underline;
}
Just one file will not be enough in production-ready app, so, like javascript, let’s see how to reference another file :
1
2
3
4
// inside app/frontend/css/mycomponent.scss
h1 {
  font-style: italic;
}
Update mainstyle.scss to reference this new custom component :
1
2
3
4
5
6
7
// inside app/frontend/packs/mainstyle.scss
@import "../css/mycomponent.scss";

// Just a quick ugly style to see if our CSS works
h1 {
  text-decoration: underline;
}
Good ! So now let’s tell the main layout that we want to use webpack for stylesheets :
1
2
3
4
5
6
7
8
9
10
11
12
13
14
15
16
17
18
19
<!-- inside app/views/layouts/application.html.erb -->
<!DOCTYPE html>
<html>
  <head>
    <title>My title</title>
    <meta name="viewport" content="width=device-width,initial-scale=1">
    <%= csrf_meta_tags %>
    <%= csp_meta_tag %>

    <!-- Add line below, stylesheed_pack_tag -->
    <%= stylesheet_pack_tag 'mainstyle' %>
    <%= javascript_pack_tag 'mainjs' %>
  </head>

  <body>
    <%= yield %>

  </body>
</html>
Stop your local web server, and run
1
2
$/myapp> bin/rails assets:clobber
$/myapp> bin/rails webpacker:compile
Check your manifest.json file, and run your local web server again, you should see a title that is displayed both italic and underlined.
Webpacker for font family
Download the “Asap” font here, unzip it, and copy/paste the file named Asap-VariableFont_wght.ttf into app/frontend/font/Asap/Asap-VariableFont_wght.ttf
Then add a file font_faces.scss at app/frontend/css/font_faces.scss
1
2
3
4
5
6
@font-face {
  font-family: 'Asap';
  src: url('../font/Asap/Asap-VariableFont_wght.ttf') format('woff2 supports variations'),
       url('../font/Asap/Asap-VariableFont_wght.ttf') format('woff2-variations');
  font-weight: 100 1000;
}
Update mainstyle.scss to reference the font face :
1
2
3
4
5
6
7
8
9
10
11
// inside app/frontend/packs/mainstyle.scss
// Add the line below on the top of the file
@import '../css/font_faces';
@import "../css/mycomponent.scss";

// Just a quick ugly style to see if our CSS works
h1 {
  // And add this line below to ensure font-family works
  font-family: 'Asap';
  text-decoration: underline;
}
Again, stop your local web server, and run
1
2
$/myapp> bin/rails assets:clobber
$/myapp> bin/rails webpacker:compile
Check your manifest.json file, and run your local web server again, you should see a title that is displayed italic, underlined… and with the font-face named “Asap”.
Webpacker for images
Create a SVG file named rectangle.svg into app/frontend/img/rectangle.svg
1
2
3
4
<!-- inside app/frontend/img/rectangle.svg -->
<svg width="200" height="200" xmlns="http://www.w3.org/2000/svg">
  <path d="M10 10 H 90 V 90 H 10 Z" fill="red" stroke="black"/>
</svg>
Then add one line to the main JS file, like this :
1
2
3
4
5
6
// inside app/frontend/packs/mainjs.js

// Add the line below
const images = require.context('../img', true)

// Everything else remain the same
Now the image can be referenced from any other file
1
2
3
<!-- inside app/views/welcome/index.html.erb -->
<h1> Hello, Rails and Webpack ! </h1>
<%= image_pack_tag 'media/img/rectangle.svg', alt: 'A rectangle' %>
Please note that webpack adds the “media” prefix to the path.
Again, stop your local web server, and run
1
2
$/myapp> bin/rails assets:clobber
$/myapp> bin/rails webpacker:compile
Check your manifest.json file, and run your local web server again, open the browser, and ta-da : you should now see the rectangle that appears.
Conclusion
We have seen how to make Webpacker work with Rails. For Javascript files, stylesheets, images, and fonts. With a real example, from scratch. Don’t worry, you won’t have to compile assets and restart the server on each change. This was needed for this tutorial only because we added a fresh new kind of asset at each step.
Enjoy !
